Blinking a LED
Blinking a LED
In this section, you will learn how to blink the built-in LED on ESP8266-based microcontroller using the MicroPython REPL.
Before the LED on the ESP8266-based microcontroller can be blinked, MicroPython needs to be installed on the microcontroller and PuTTY needs to be installed on your computer. PuTTY facilitates interaction between a computer and the microcontroller using the serial communication protocol. An alternative to PuTTY is a MacOS or Linux terminal and the screen utility. The screen utility can also be used for serial communication.
Most ESP8266-based microcontrollers (such as the Adafruit Feather Huzzah ESP8266) have a built-in LED mounted on the board. On many boards, the built-in LED is connected to Pin 0. You can control the board's built-in LED with MicroPython's machine module.
Connect the ESP8266-based Microcontroller to the computer and bring up the MicroPython REPL
Connect the ESP8266-based microcontroller to the computer with a microUSB cable. Ensure the microUSB cable is a USB data cable, not just a charging cable. Open PuTTY and connect to the microcontroller using the proper serial port (COM#) and 115200 baud. (Remember to use the Serial radio button under Connection Type:)

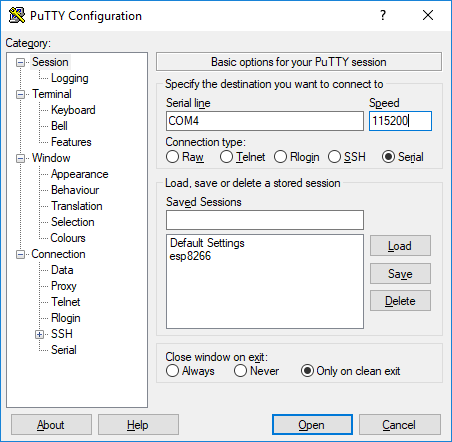
Clicking [Open] will bring up the MicroPython REPL prompt >>>. If you can't see the >>> prompt, try typing [Enter] or [Ctrl]+[D] or push the RESET button on the microcontroller. If none of these methods work, try closing PuTTY and unplugging then replugging in the microUSB cable that connects the board to the computer.
Use the MicroPython REPL to turn the microcontroller's LED on and off
Test to see if the MicroPython REPL is functioning correctly with a basic Hello World program. Type the following into the PuTTY window:
>>> print("Hello World")
Hello World
Next, try to turn the microcontroller's built-in LED on and off. Most ESP8266-based microcontrollers (such as the Adafruit Feather Huzzah ESP8266) have a built-in LED connected to Pin 0. If you control the voltage going to Pin 0, you control if the built-in LED on the microcontroller is on or off. To control a Pin on a microcontroller with MicroPython, you first need to import the machine module. The machine module is built into MicroPython, but absent from "regular" Python. Next, a Pin object needs to be created. The integer passed into machine.Pin() determines the pin number assigned to the Pin object.
>>> import machine
>>> pin = machine.Pin(0)
The value of Pin0 (on or off) is determined with the command below.
>>> pin.value
1
In or assign a value to Pin 0, the Pin object must be assigned as an output pin. An output pin is a pin where a program or user determines the pin output. An input pin is a pin set up to read input, like the input from a sensor. In this case, you want to assign Pin 0 as an output pin.
>>> pin = machine.Pin(0, machine.Pin.OUT)

# turn the LED on
>>> pin.value(0)

# turn the LED off
>>> pin.value(1)
Run code at the MicroPython REPL to blink the LED
Now let's make the microcontroller's built-in LED blink. Blinking the LED can be accomplished with a simple for loop. At the MicroPython REPL, initiating a loop automatically indents the next line, so a tab is not needed before the pin.on() statement. To run the loop, type backspace on an empty line (to backspace from an indented line) and hit [Enter].
>>> import machine
>>> import time
>>> pin = machine.Pin(0, machine.Pin.OUT)
>>> for i in range(10):
...     pin.on()
...     time.sleep(0.5)
...     pin.off()
...     time.sleep(0.5)
...
The microcontroller's built-in LED turns on and off for a total of about 10 seconds.